Showing posts with label DIY. Show all posts

Thursday, February 16, 2017

Q-Tip Drop

Every time I go to the bathroom Beatrix pulls all the Q-tips out of the box in the cupboard. I decided to harness her interest and turn it into a fine-motor-skill-honing activity!


This has been such a hit and it couldn't have been easier to throw together.

Supplies:

  • Cardboard (I used a cereal box)
  • Mason Jar with lid
  • Q-tips
  • Scissors
  • Utility knife
  • Writing utensil (optional)


I think it is pretty self-explanatory. I traced around the outer edge of the ring part of the lid and cut out the circle. I trimmed it a little to the inside so the lid would screw on. I used a utility knife to cut a hole in the center (ish) and decorated it with some arrows pointing to the hole. I think you could potentially use a hole punch, if it was big enough. screw the lid on the jar and voila! 


I love the look of pride on her face when she gets one in! It is just difficult enough to keep her occupied for minutes on end without being so hard it frustrates her. She has asked me to take the lid off a few times - the little smarty figured out that it would be so much easier to get them in the jar that way. Work smarter not harder! She was so pleased that she was allowed to play with some Q-tips and has actually left the ones in the cupboard pretty well alone. Now instead of them being all over my bathroom, they are all over my living room, haha.


Monday, February 13, 2017

Last-minute Toddler Valentine Crafts!

In this post I will go over two quick and easy Valentine's Day crafts that are fun for toddlers. One is messy and one is not!

First up is a heart-shaped sun catcher.


Supplies needed:
  • Contact paper
  • Tissue paper
  • Washi tape (optional)

I drew a heart on contact paper and cut some tissue paper into little squares.


Peel off the paper backing and you are good to go. Show your child how the tissue sticks to the contact paper and let them have at it!


Beatrix was not too sure about the sticky paper. But she came around and had quite a good time making this craft. We also explored the laws of gravity by watching squares of tissue paper float to the ground.


To finish it off, I lay it down on another sheet of contact paper and trimmed the excess. I wrapped washi tape to finish the edges, but that is totally optional.

Of course it wasn't too sunny of a day, but it sure looks beautiful in the window. ;)

Next up: DIY Toilet Paper Roll Heart Stamp


Supplies Needed:
  • Empty toilet paper roll
  • Tape
  • Paint
  • Paper
You will also need something to squeeze the paint on (I use a paper plate) and you may want some kind of paint smock for your child and a protective covering for your work space. Have a damp washcloth ready for easy clean up!


Here is the stamp. Basically, flatten a toilet paper tube and crease the folds. Then tuck one point inside and sort of squeeze it to make a heart shape. I used tape to keep it in the correct shape.


It doesn't have to be perfect!


I use a pair of garage-sale footie PJ's as a coverall paint smock. Just zip it right over her clothes!


I wasn't sure if Beatrix would grasp the concept of the stamp, but she actually did really well!


Of course, we painted with our hands too.


 Here is the finished product! We actually painted 3 sheets of paper before she got tired of this activity!

So there you have it! Two toddler Valentine's Day crafts that you can pull off at the last minute!


Saturday, December 10, 2016

DIY No-Sew Carseat Poncho (and One for Your Build-A-Bear Too!)


I advocate for a lot of things: breastfeeding, babywearing, cloth diapering, and carseat safety! If you choose not to do the first three, that is your choice and I do not judge you for that. But if you choose to be flippant about carseat safety, that makes me upset. One big rule with carseats is no coats! Last winter we had one of those Cozy Covers on her infant seat and just zipped that over the top. This year it is not so easy. I am not a fan of fussing with the coat on and off in the car. (In fact, many times I don't wear a coat, because I don't like to fuss with it.) This idea seemed so genius to me! A lady in my mom group was making these for some other members and so I decided to make my own version!

  
The first step was choosing the fabric. Beatrix quickly fell in love with this print. She really loves puppies! We went with a solid gray for the back (you could just do one layer if you live somewhere not quite as chilly.) I got 1 yard of each. Since we did two layers this is reversible! Then I measured from her shoulder down to about halfway between her knee and her foot. I doubled that length for my measurement of where to cut. So hers is 1 yard wide by however tall x 2 (I could not find my measuring tape so I just used a string). Mr. Fish suggested we make Cupcake a matching poncho with the extra. Cupcake is the puppy she made at Build-A-Bear on her birthday and she is quite attached. The pictures I took of the process are with Cupcake's poncho, but it all works the same way.

Disclaimer: I tend to just wing things and I did not follow a pattern, nor do I have exact measurements. That is just the way I do things. This was really easy and no-sew fleece projects are very forgiving. You could also hem this instead of tying the edges if you like. I just didn't feel like dragging out my sewing machine. I just put it away last week after finishing up Christmas presents.

Set both of your fabrics on top of each other and cut to the desired size. You could make the end shape a circle or a diamond if you like - make those cuts now. We went with a rectangle for simplicity sake. Next you want to cut the neck hole. Fold the fabric in half the hamburger bun way, then the hot dog bun way. Mark the center and then make a small cut down into the fabric and then across the fold on each side. It should look like the picture below on the right. I just guesstimated the neck hole size, but you could measure the neck of a shirt that fits.


Next, cut each of the triangles that make up the neck hole in half and in half again like you see below.


(Can I just add how I hate cutting fabric with animals or people on it? It is so freaky cutting through their heads and limbs!!!)

Next tie each of those little triangles with the corresponding triangle in the layer below. You could trim the ends if you like. Here it is with the neck hole tied and the fringe cut.


Below on the left is Cupcake's poncho all finished! Cupcake is modeling the print and the gray below in the middle and right pictures, respectively. (She holds more still than Beatrix.)


Above is Bea's finished poncho, folded, like it would be if it were on her. Below it is all laid out.


We also had enough fabric to make a small blanket for Cupcake or her dollies. Below are the two matching cuties! She was not too thrilled that she could not see her arms, but she got used to it quickly.


Here it is in action! The idea is to flip the back up over the back of the carseat, lift the front and buckle underneath that. Keeping your little one warm and cozy AND safe too!


Thursday, November 10, 2016

Muffin Tin Sorting


This activity requires zero planning ahead and is good for developing fine motor skills. Just grab a muffin tin - even an egg carton would work! Gather together some objects that will fit into the cups (make sure they are not a choking hazard if your little one is still mouthing things!) We have been using seashells, but you could get really creative with this!

Show your child how to set things in the cups and dump them out. Depending on the age of your child you could use tongs or clothespins while transferring objects to add to the fun!

With Beatrix we just focused on putting a shell into each cup. With older children you could sort different colored objects or objects of different shapes in to different cups - the possibilities are endless!


Dumping them all out at the end is her favorite part right now! 

Wednesday, October 26, 2016

Sticky Spiderweb ~ Toddler Craft

I just love doing crafts and Beatrix is at an age where she is able to do some fun process art and I am loving it! Yesterday we both had a great time making this "Sticky Spiderweb"!
I took some strips of packing tape and stuck them together to make a big sheet of stickiness. (Contact paper would be ideal for this, but I didn't have any.) I then taped that to her highchair tray.
I let her feel how the tape was sticky.
Then I gave her some pieces of twine (you could use any yarn or string you have sitting around) and showed her how to stick it down. I ended up cutting the strings much smaller than I had initially made them.

 She enjoyed pulling up the strings almost as much as she liked sticking them down. While she played, I told her about spiderwebs and how the string the spider uses is clear and sticky to catch bugs. I just love her concentrating face!
Here we were just about done with our web. I had her pat it all over to really get the string stuck down. She liked this part! When she lost interest in playing with the string and the sticky, I got her down and pulled up the tape. I cut off the pieces that held it to the tray and taped it onto a piece of construction paper - sticky side down. I added a little spider friend, the date and her name, and then hung it on the wall!
We had such a fun time doing this craft together. I hope you take some time this week to create something with your little ones!


Tuesday, October 25, 2016

Beatrix's Bum-kin

Handprint crafts and babies don't mix very well. When they are really little they don't want to open up their hand but when they are bigger they won't hold still. So what to do to commemorate baby's first Halloween?

The bum-kin!
That's right. A bum print, decorated to look like a pumpkin! 

I don't have pictures of the process, because as you can imagine, it took all the spare hands available! We stripped her down naked in the bathroom and Mr. Fish and I wore old clothes that could get paint on them. I quickly coated her cheeks in pumpkin orange paint (I used acrylic because it was what I had. If you were worried about toxins or things like that, you could use fingerpaint.) After painting her bum, I plopped her onto a canvass that I had sitting on the toilet lid and then into the bath she went! She tolerated the whole process without a fuss. WhIle Mr. Fish washed her up I added a few finishing touches. 

I look forward to the look on her face when she is a teenager and I am still proudly displaying her bum-kin for all her friends to see! (Tee hee!)

Friday, October 14, 2016

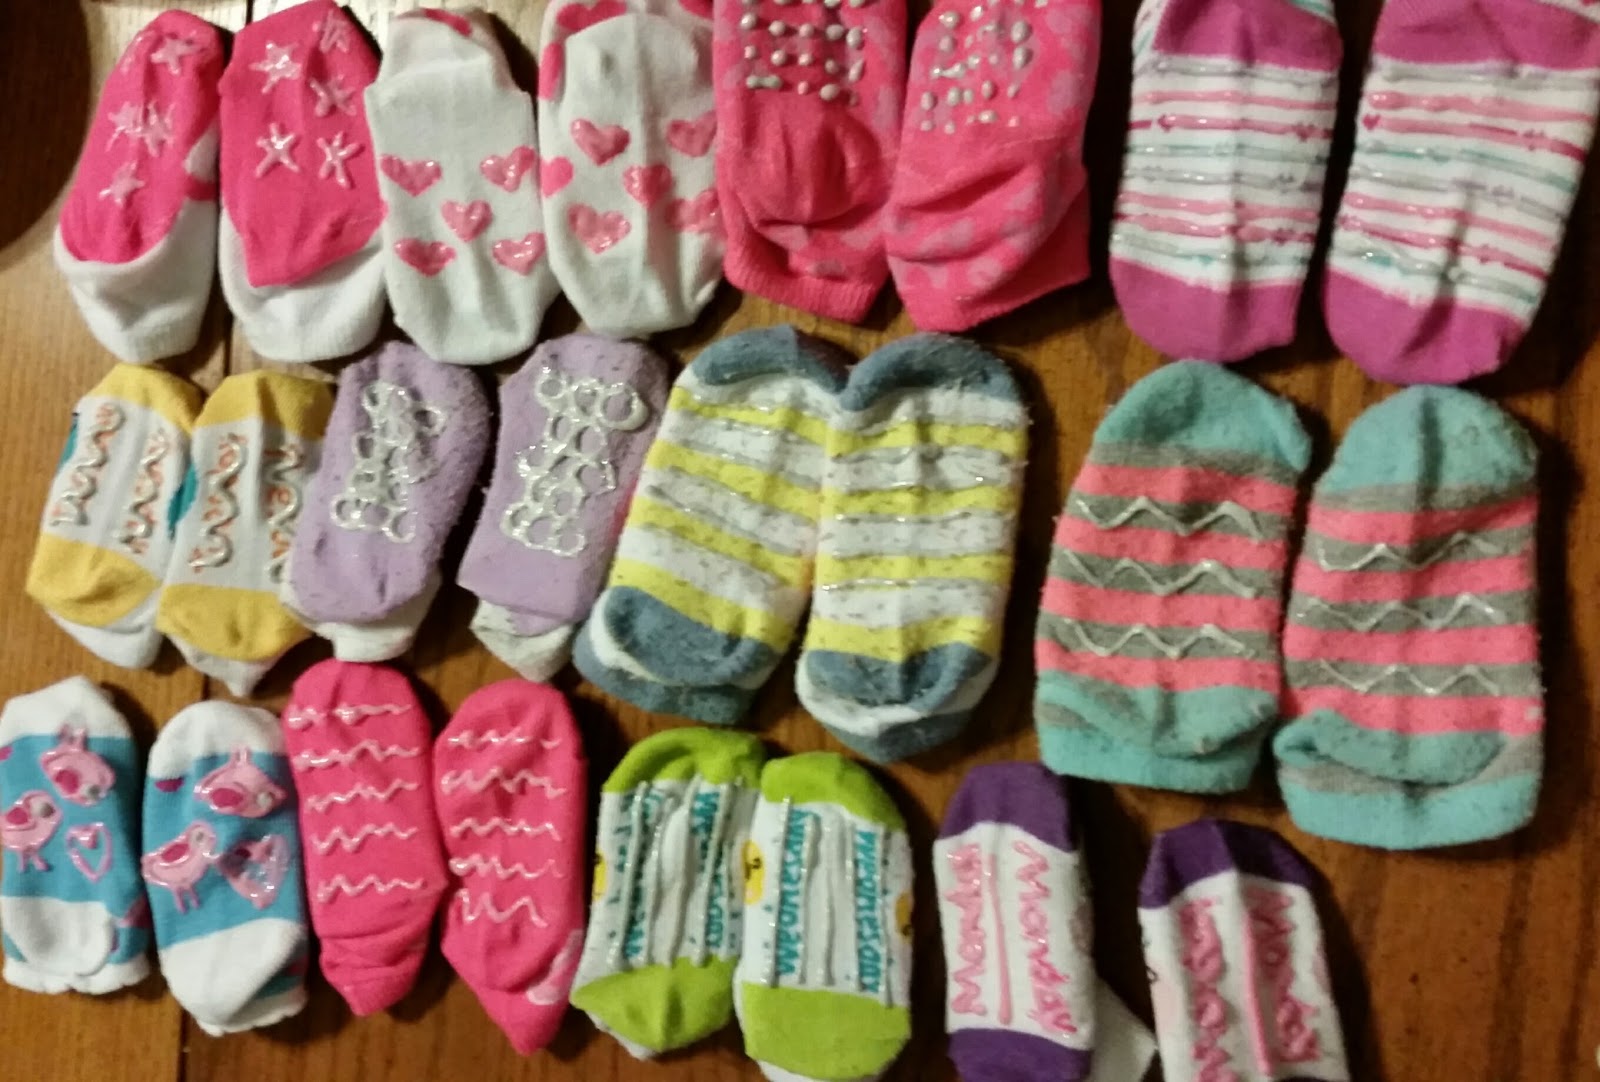
DIY Non-skid Socks

Poor Beatrix has a hard enough time crawling in pants, let alone with socks on too. She has plenty of socks, most of them second-hand, and I wanted to find a way to make them work. Enter: puff paint! A little puff paint on the bottom on her socks will make a big difference!
The paint was about $3 a bottle. I resisted the urge to buy the 10 pack and stuck with sparkly pink and silver. You will also need something to slip in the socks to keep the paint from oozing to the top of the sock - I used some cardboard that came in a box of party supplies for Bea's birthday! 
On some socks I traced the design on the sock, others I drew fun shapes or squiggles.
 Even Mr. Fish joined in on the fun!

The paint should be dry in about 4 hours but it is not safe to wash for 72 hours. (Be sure to follow the directions on the bottle of whatever brand you buy.)

I will be doing a few more batches, I think they turned out really cute!